
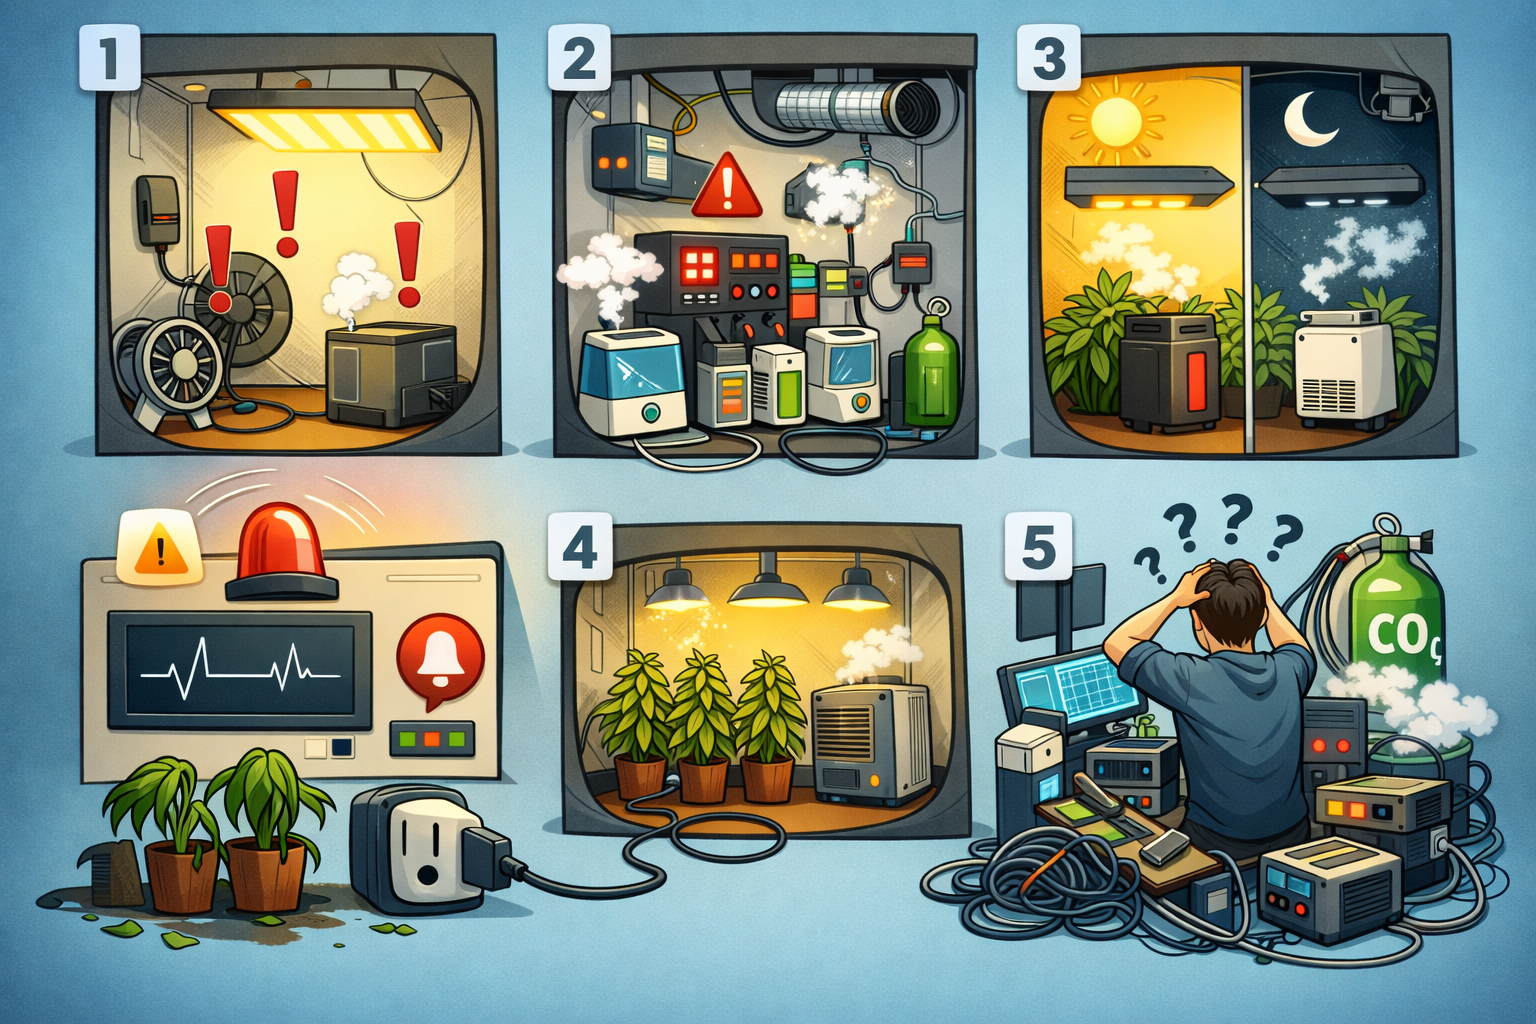
5 Mistakes Beginners Make with Grow Automation (And How to Fix Them)
Avoid the most common pitfalls when automating your grow tent. From bad sensor placement to over-engineering your setup — here is what to watch out for.
5 Mistakes Beginners Make with Grow Automation (And How to Avoid Them)
Automating your grow room is one of the best decisions you can make as an indoor grower. Stable climate around the clock, no more manual checks at 2 AM, consistent VPD without constant tweaking – grow automation done right genuinely transforms your results. But the path to a well-tuned automated grow is full of small traps that cost time, money, and yield.
Whether you're running Home Assistant with OpenGrowBox, building your first ESPHome sensor, or setting up a commercial controller, these are the five mistakes almost every beginner makes. Knowing them in advance puts you ahead of most growers who had to learn them the hard way.
Mistake #1: Placing Sensors in the Wrong Location
This is by far the most common mistake in grow automation – and one of the most consequential. You spend €50 on sensors, wire everything cleanly, set up your automations – and then the system makes strange decisions because it's receiving the wrong data.
Your sensor doesn't measure the climate your plants experience. It measures the climate at the exact point where you mounted it. And that difference can be significant enough to throw off your entire automation logic.
What goes wrong:
- A sensor near the intake measures cooler, drier air than the actual canopy climate – your automation thinks it's colder than it is and runs heating unnecessarily
- A sensor directly under the grow light reads artificially high temperatures and triggers cooling systems even though the plants themselves are at the right temperature
- A sensor in a dead zone behind a reflective wall or in a corner receives stagnant air and delivers readings that have nothing to do with the dynamic climate in the rest of the tent
- Inaccurate sensor data cascades through your entire automation: wrong temperature input → wrong VPD calculation → wrong device decisions → stressed plants
The solution: Mount your primary sensor at canopy height, in the center of the tent, away from direct airflow and light sources. It should measure what your plants actually experience – not what the air does at the intake or directly beneath the lamp.
In larger grow rooms or multi-zone setups, use two or more sensors and average the readings. OpenGrowBox automatically calculates VPD from the average of all assigned sensors in a room – a significant advantage over single-sensor setups and one of the key reasons accurate sensor placement matters even more in automated systems.
Pro Tip: Secure your sensor to a small bamboo stake with a zip tie and position it right at the tip of your tallest leaves. This gives you the most accurate reading of what your plants are actually experiencing – and forms the foundation for precise VPD control.
Mistake #2: Automating Everything at Once
Home Assistant is running, OpenGrowBox is installed, and you can see the possibilities: lights, exhaust fan, circulation fan, humidifier, dehumidifier, CO₂ controller, irrigation pump – everything can be automated. The temptation to do it all immediately is understandable.
The problem: when something goes wrong in a fully automated complex system – and something always goes wrong at the beginning – you have no idea which part caused it. Debugging a fully automated grow without baseline knowledge of how your specific environment behaves is frustrating, time-consuming, and often leads to worse problems.
What goes wrong:
- A misconfigured fan automation runs at the wrong time and desiccates seedlings or fresh cuttings overnight
- A humidifier and dehumidifier fight each other because the thresholds overlap or hysteresis is missing – both devices run simultaneously and waste power while achieving nothing
- A device that's supposed to control the environment responds to phantom readings from a poorly placed sensor, making the entire system behavior unpredictable
- You spend more time debugging automations than actually growing
The solution: Automate one thing at a time, with roughly a week between each addition. The sensible order:
- Lighting control – simplest automation, biggest direct impact on the plant cycle
- Temperature control – the foundation for everything else; learn how your tent responds to heating and cooling before adding complexity
- Humidity control – add this once temperature is stable, since both are deeply linked
- VPD control – when temperature and humidity run cleanly, set VPD as the overarching target
- Additional systems – CO₂, irrigation, nutrient dosing only once the foundation is solid
Warning: Running a humidifier and dehumidifier simultaneously without clean logic and adequate hysteresis is one of the fastest ways to waste electricity and wear out both devices within a single grow.
Mistake #3: Ignoring the Difference Between Day and Night Conditions
Your grow climate with lights on and lights off are two fundamentally different environments. Your grow lights produce substantial heat and drive transpiration. When they go off, temperature drops, transpiration falls, relative humidity rises – and VPD shifts accordingly.
An automation with a single static target value for all 24 hours constantly fights against these natural cycles. That costs energy, wears devices out faster, and creates unnecessary stress for your plants.
What goes wrong:
- The heater runs all night at full capacity trying to maintain daytime target temperatures that simply aren't needed in the dark period
- Humidity spikes after lights-off continuously trigger the dehumidifier, which fights against naturally rising night humidity and runs almost non-stop
- Aggressive correction cycles cause rapid temperature and humidity swings that stress plants and increase the risk of mould
- Unnecessarily high energy consumption from devices solving problems that don't actually exist during the dark period
The solution: Use time-based automation profiles in OpenGrowBox – a separate profile for the light period and one for the dark period. A typical setup:
- Light period: Target temperature 24–26°C, target VPD 1.0–1.2 kPa (flowering)
- Dark period: Target temperature 18–22°C, higher humidity accepted (60–65%), more relaxed VPD control
This mirrors natural outdoor cycles, significantly reduces device wear, and noticeably lowers energy consumption during the dark period.
Pro Tip: A day-to-night temperature drop of 8–10°C in late flower is a well-documented cultivation technique for triggering anthocyanin production (purple and blue colors) and enhancing terpene development in certain strains. With automated night profiles in OpenGrowBox, this can be implemented precisely and reproduced consistently across every grow.
Mistake #4: Skipping Alerts and Data Logging
Automation doesn't mean setting everything up and forgetting about it entirely. Devices fail. Power outages happen. A pump jams, a relay dies, a sensor goes offline. Without active monitoring and notifications, this can go unnoticed – and a small problem becomes a dead crop.
Grows without a monitoring system are particularly vulnerable to silent failures: the system appears to be running normally because the failed sensor is no longer sending data, but the automation is responding to stale or missing values.
What goes wrong:
- No notification when temperature exceeds critical thresholds – you come back from a weekend trip and find your plants in a 38°C tent
- No log to trace back what went wrong two days ago – you see only the effects, not the cause
- A failed relay or empty reservoir goes unnoticed for days because no alert is configured
- Mould develops overnight during a humidity spike that nobody caught
The solution: Set up Home Assistant notifications – via the app, Telegram, email, or SMS – for the following events:
- Temperature above 32°C or below 15°C
- Humidity above 70% (acute mould risk) or below 25% (stress risk)
- VPD outside the target range for more than 60 minutes
- Any sensor going offline or failing to report recent data
- Unexpected device states (light on during dark period, pump running continuously)
OpenGrowBox automatically logs all sensor data. Review the historical charts at least once a week – patterns in the data often reveal problems before they become critical. A gradually rising baseline VPD over several days, for example, often points to a drifting sensor or a device that's losing effectiveness.
Important: A €10 smart plug with energy monitoring is one of the cheapest and most effective monitoring tools for your grow. A humidifier that suddenly stops drawing power has run out of water or failed. A fan with unusually high power consumption is announcing a mechanical problem before it becomes a complete breakdown.
Mistake #5: Over-Engineering Before Understanding Your Environment
Automated CO₂ injection with PPM control, multi-zone climate control with individual VPD targets per canopy level, computer-vision-based leaf analysis, automatic pH and EC dosing in hydro – these technologies exist, work, and are genuinely fascinating. And they make complete sense once you understand your environment deeply.
But building a highly complex system before you know how your specific tent responds to heating, cooling, irrigation, and ventilation is a recipe for confusion and frustration. Complexity amplifies both what works and what doesn't work – and if you don't understand the basics yet, you can't tell which is which.
What goes wrong:
- CO₂ injection into an unsealed tent – the CO₂ escapes immediately and you waste expensive gas without achieving any measurable effect
- Multiple sensors with contradictory readings that you can't explain because you don't yet know the baseline characteristics of your tent
- A system so complex that every change has unpredictable side effects across multiple other systems
- You spend more time maintaining the automation than actually caring for your plants
- When something goes wrong, you don't know where to start looking
The solution: Use your first automated grow deliberately as a learning run. Automate only the essentials – light scheduling, rough temperature control, humidity band – and let OpenGrowBox log everything. Resist the urge to intervene; observe instead.
After harvest, you'll have real data about your specific setup: How does temperature behave after lights-off? How long does your humidifier take to raise humidity by 5%? How does CO₂ concentration respond to different fan speeds? These insights are invaluable for every subsequent grow and will inform every automation decision you make going forward.
Success: The growers who consistently get the best results from grow automation are not the ones with the most complex systems. They are the ones who understand their specific environment deeply and apply precise, targeted automations based on real data – not guesses or forum recommendations that may not apply to their setup.
Summary: The 5 Most Common Grow Automation Mistakes
| Mistake | Root cause | Quick fix |
|---|---|---|
| Wrong sensor placement | Sensor not at canopy level | Tent center, leaf tip height, away from airflow and lights |
| Automating everything at once | Impatience during setup | Step by step: lights → temperature → humidity → VPD |
| Ignoring day/night cycles | Single static target for 24h | Configure separate day and night profiles in OpenGrowBox |
| No alerts or data logging | "Set and forget" mindset | Set up HA notifications + weekly log review |
| Over-engineering too early | Too many systems simultaneously | Use first grow as a learning run, collect data, then expand |
Grow automation is not a one-time setup – it's a continuous learning process. Every run teaches you something new about your environment, your hardware, and your plants. OpenGrowBox gives you the tools and the data. Your job is to learn from both.
Start simple. Stay curious. Let the data drive your decisions. And remember: the best growers in the world all started with the same mistakes – the difference is that they learned from them.
Ready to get started? Check out our step-by-step OpenGrowBox setup guide for Home Assistant and start your first automated grow today.
Related Articles
No related articles found.